

This tutorial will guide you through the steps to create a Sequence-to-Sequence[1] (Seq2Seq) model with Attention[2][3] used to implement the rDany Chat-bot.
The Seq2Seq model is made up of an Encoder (left side) that is linked to the Decoder (right side) by the Attention layer which essentially learns to map the encoder input to the decoder output. During the model processing, an embedding is learned for the encoder and decoder inputs. An encoder embedding is produced for both the encoder input and its reverse representation. These two embeddings are then fed into two LSTM layers that learn the encodings for each which are then concatenated together to produce the encoding inputs that eventually are fed to the Attention layer within the LSTMAttention layer. An embedding is also learned for the decoder inputs which are then fed to the LSTMAttention layer as well.
Within the LSTMAttention layer, the encoder encodings and last state from the LSTM Attention layer are used to produce the context for the encoding inputs. This context is then added to the LSTM cell state to produce the decoded LSTM outputs which are then run through an internal inner product and eventual softmax output. The softmax output is then used to determine the most likely word index produced which is then converted back to the word using the index-to-word mapping of the overall vocabulary. The resulting cell state is then fed back into the attention layer to produce the next context used when running the decoding LSTM on the next decoder input.
During training, the decoder input starts with the start of sequence token (e.g. ‘1’) and is followed by target0, then target1, and so on until all expected targets are processed in a teacher forcing manner.
Once training completes, the model is run by first feeding the input data through the model along with a decoder start of sequence (e.g. ‘1’) token and then the decoder half of the model is run by feeding the resulting output token back into the decoder input and continuing until an end-of-sequence token is produced. The string of word tokens produced are each converted back to their corresponding words and output as the result.
This powerful model essentially allows for learning how to map the probability distribution of one dataset to that of another.
Now that you know how a Sequence-to-Sequence model works, lets jump in and build a Seq2Seq model for the Chat-bot.
Step 1 – Create the Project
The first step in creating a model is to select Solutions pane and then press the Add Project (![]() ) button at the bottom pane.
) button at the bottom pane.
Next, fill out the New Project dialog with the project name, a MODEL dataset, select Create Template-based Model/Solver and use the Seq2Seq model and Seq2Seq solver templates..
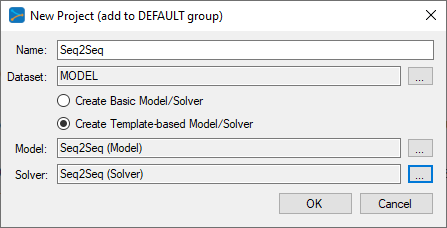
When selecting the dataset, make sure to select the MODEL dataset type as shown below.
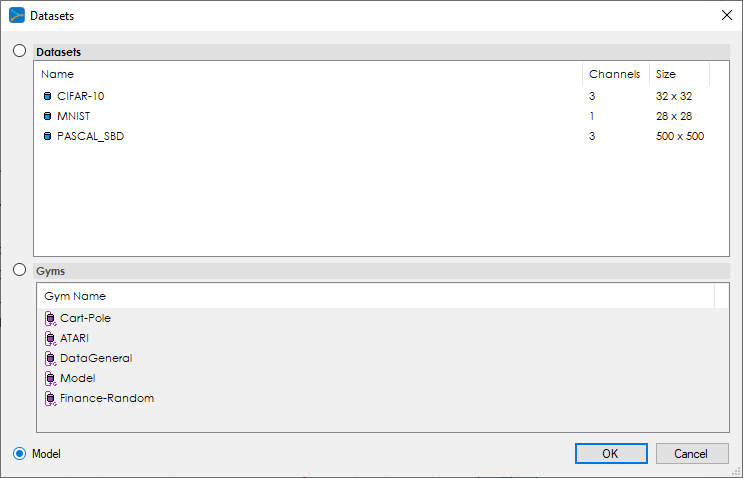
The MODEL dataset specifies that the data will come from within the data layer of the model.
After adding the Seq2Seq project, the new project will be added to the solutions.
To view the Seq2Seq project, just double click on the seq2seq item within the Seq2Seq project. This will open the visual model editor containing the Seq2Seq model for the chat-bot which looks as follows.
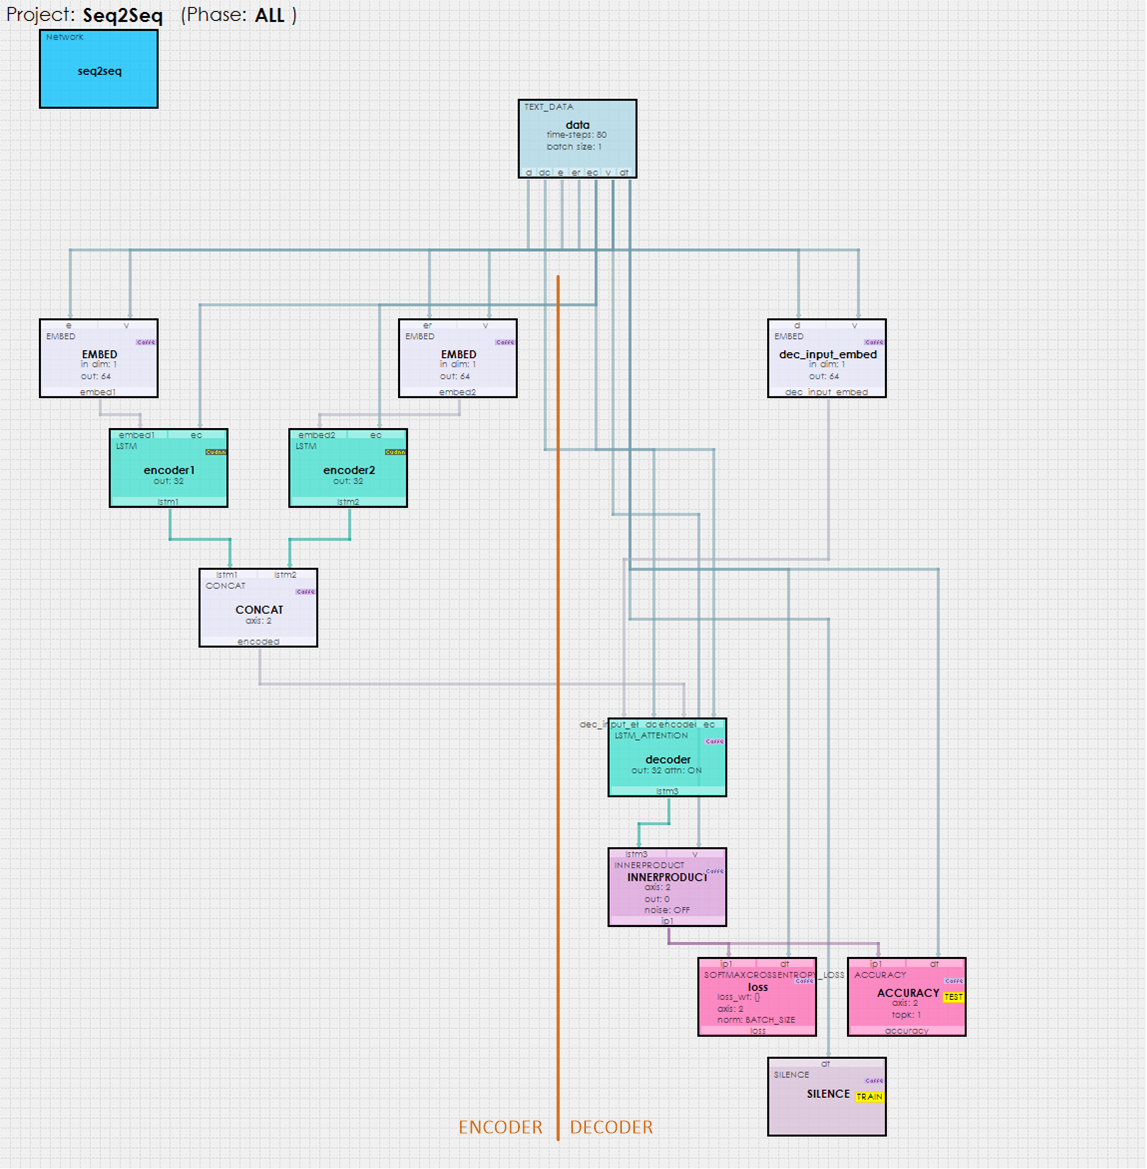
As described above, the data inputs (from the person talking to the Chat-bot) are encoded on the left side of the model and fed into the LSTM ATTENTION layer which uses its internal ATTENTION layer to help decode the inputs into the learned decoded inputs (the learned responses from the Chat-bot). This mapping is then fed to an INNERPRODUCT layer which is then used to decode the outputs to the appropriate words making up the Chat-bot’s response.
Model Configuration
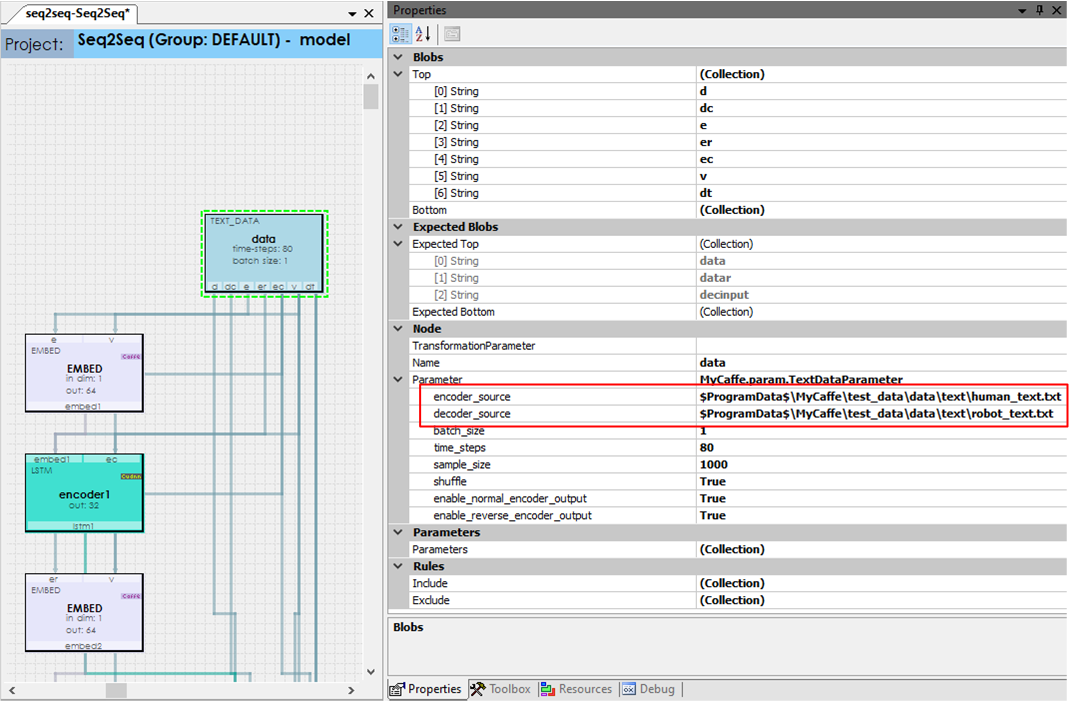
The model uses the MODEL dataset type which means that the data layer is responsible for loading and providing the data to the model. The input data is specified via the encoder_source and decoder_source DATA layer properties. These two files both contain the same number of lines of text where each line in the encoder source maps to a corresponding line of text in the decoder source where the encoder source lines represent the communication from the human (e.g. you) and the corresponding lines in the decoder source represent the response of the chat-bot.
Step 2 – Training and Testing the Seq2Seq Model
To start training, press the Run Training (![]() ) button in the lower left corner of the Project Window.
) button in the lower left corner of the Project Window.
After training for around 2.8M iterations (around 200 epochs) with a batch size of 1 (currently, only single batches are supported), you should see an accuracy of 60% or greater.
To test the Seq2Seq, stop the training and select the Test Many radio button at the bottom of the Project window and press the Run Testing (![]() ) button.
) button.
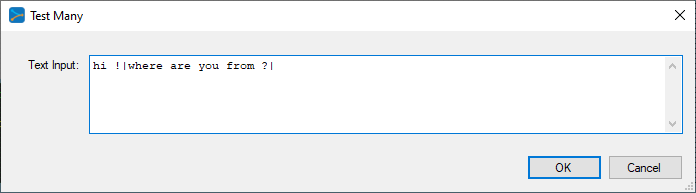
The TestMany allows you to enter a set of queries to the Chat-bot, where each input statement is separated by a ‘|’ character. For example in the dialog shown above, the following queries are sent to the Chat-bot:
'hi !'
'where are you from ?'
''
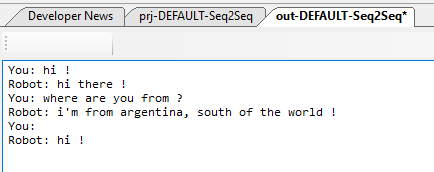
And in response, the Chat-bot’s replies are displayed in the next window that appears after running the queries through the Chat-bot model.
Congratulations! You have now created and trained your first Seq2Seq Chat-bot with MyCaffe!
To see the SignalPop AI Designer in action with other models, see the Examples page.
[1] Ilya Sutskever, Oriol Vinyals, and Quoc V. Le, Sequence to Sequence Learning with Neural Networks, 2014, arXiv:1409.3215.
[2] Ashish Vaswani, Noam Shazeer, Niki Parmar, Jakob Uszkoreit, Llion Jones, Aidan N. Gomez, Lukasz Kaiser, and Illia Polosukhin, Attention Is All You Need, 2017, arXiv:1706:03762.
[3] Jay Alammar, The Illustrated Transformer, 2017-2020, Jay Alammar Blog.