

This tutorial will guide you through the steps to detect objects within a video using Single-Shot Multi-Box Detection (SSD) as described by [1].
Step 1 – Create the Dataset
To create the dataset, we first need to extract the frames from the WMV video of your choice. The IMPORT.VID dataset creator is used to extract the frames from your video and add them to a new dataset that can later be used for training. From the Dataset Creator’s tab, select the IMPORT.VID dataset creator and change its properties as follows.
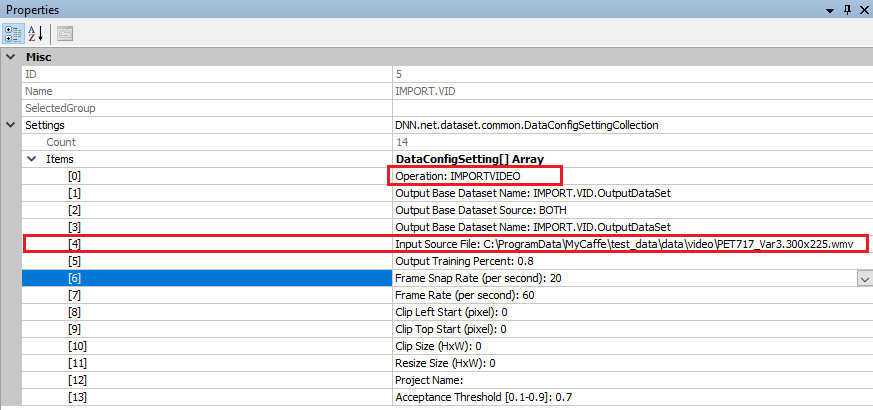
Before running the IMPORT.VID dataset creator, make sure to set the ‘Input Source File‘ property to your WMV vide file. In the demonstration above, we have set the WMV file to the sample, public-domain video installed with the SignalPop AI Designer at:
C:\ProgramData\MyCaffe\test_data\data\video\PET717_Var3.300x225.wmv
Next, run the IMPORT.VID dataset creator which will extract the frames specified and place them into an ‘output’ directory located within the same directory that has the WMV file. For our example, the video frames will be placed in the following directory:
C:\ProgramData\MyCaffe\test_data\data\video\output
Step 2 – Set Initial Labels
Before you can train on the dataset you must add the labels for the object that you want to detect an initial set of annotations of those objects for the model to train.
To set the labels for the entire dataset, right click on the dataset name ‘MyDataset‘ from within the Dataset Creators Pane and select the Set Labels menu item which displays the ‘Set Labels‘ dialog.
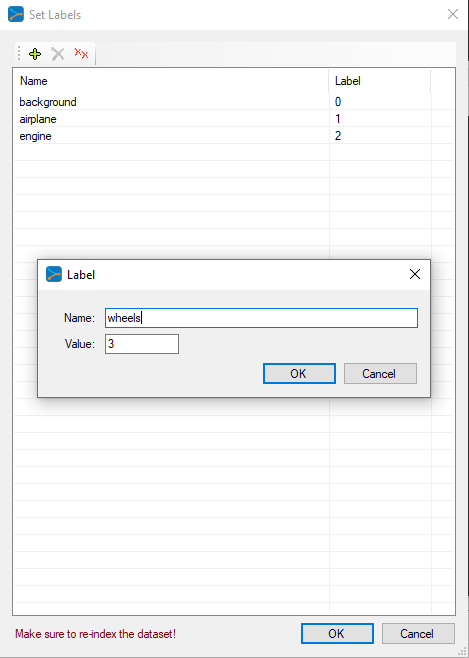
IMPORTANT: All models require that you set a background label = 0. After adding the background label, add a label for each object that you would like to detect. For our example, we have added the labels:
airplane = 1
engine = 2
wheels = 3
Along with the background label, we have a total of 4 labels.
NOTE: If you have the ‘IMPORT.VID.OutputDataSet‘ window open, you will need to close and re-open it to refresh it with your new labels.
Step 3 – Add Initial Annotations
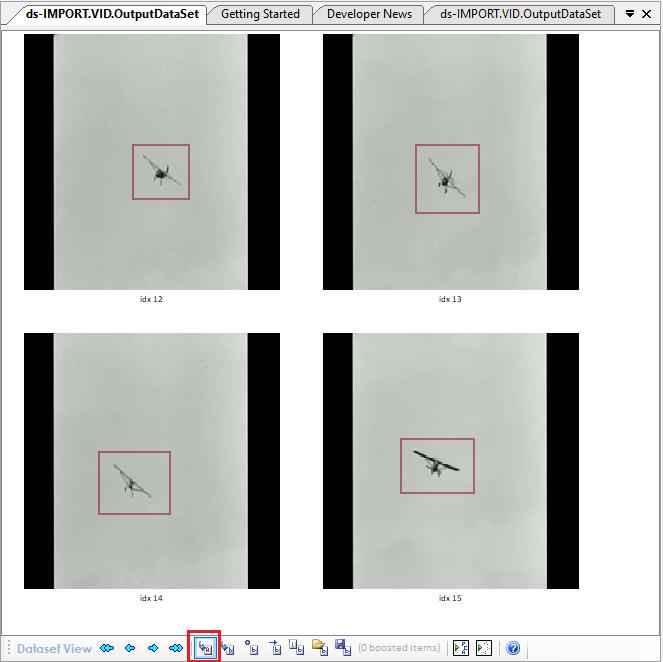
After adding your labels, (1) double click on the dataset to view the image frames, and then (2) double click on an image within your dataset.

Next we will need to annotate a small set of images – preferably with each object that you want to detect in different background settings. To add each annotation, first select the label to annotate (e.g. airplane shown below) and the draw a box around each object of that type in the image to be annotated. Once completed, select the ‘Add’ ((![]() ) button and ‘Save’ ((
) button and ‘Save’ ((![]() ) the annotations.
) the annotations.
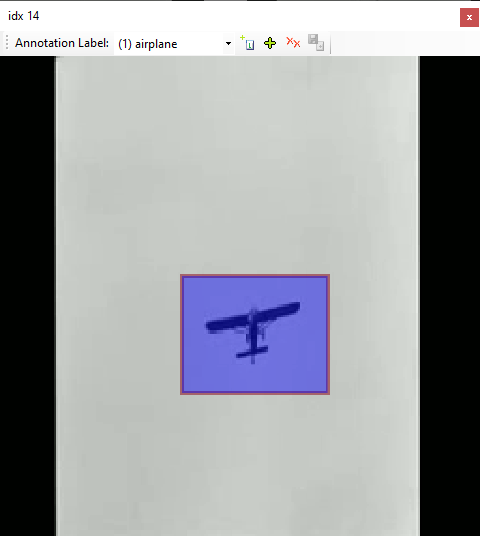
NOTE: When adding annotations, only add annotations of one label type per save. You can add multiple annotations of the same label per each save, but just make sure to not inter-mix labels between saves.
Step 4 – Select Initial Training Data
Once you have annotated 20-30 of your images, you will need to select the images for training and re-index the dataset.
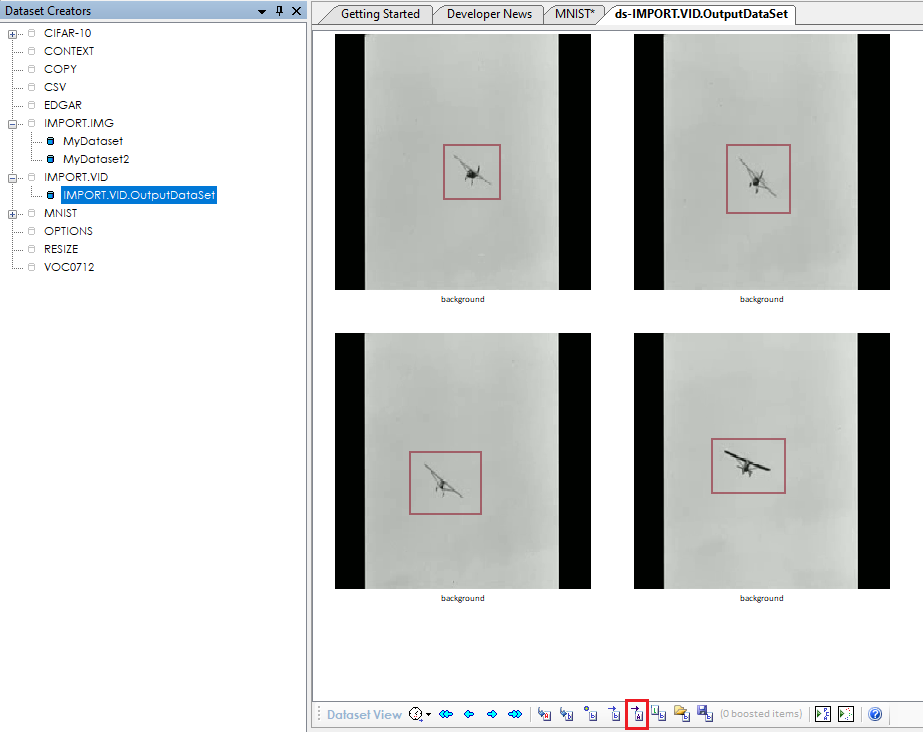
To select the training images, first click the ‘Activate annotated only‘ ((![]() ) button which will activate all annotated images in the dataset.
) button which will activate all annotated images in the dataset.
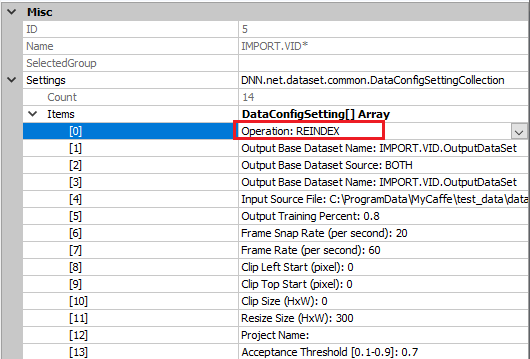
Next, the dataset must be re-indexed. To re-index the dataset, double-click on the IMPORT.VID dataset creator and change the ‘Operation‘ to REINDEX and run the dataset by pressing the ‘Run‘ ((![]() ) button.
) button.
Your dataset is now ready to be used in your initial training session.
IMPORTANT: In the event you accidentally run with the IMPORTIMAGES operation instead of the REINDEX operation it may appear that you have lost your annotations. However, your annotations are not gone, it is just that you have added new duplicate images to your dataset, which will just add to the dataset. To get see your annotated images, just reselect the annotated images using the Set Labels and Boosts Dialog as shown above and then Re-Index the dataset.
Step 5 – Creating the SSD MODEL
The first step in creating a model is to select Solutions pane and then press the Add Project (![]() ) button at the bottom pane.
) button at the bottom pane.
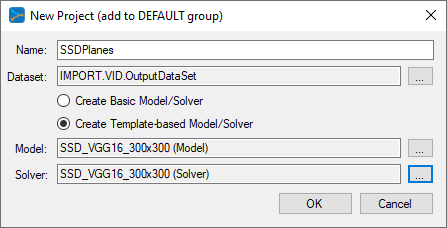
Next, fill out the New Project dialog with the project name SSDPlanes, the IMPORT.VID.OutputDataSet dataset, and select Create Template-based Model/Solver and use the SSD_VGG16_300x300 model and SSD_VGG16_300x300 solver templates.
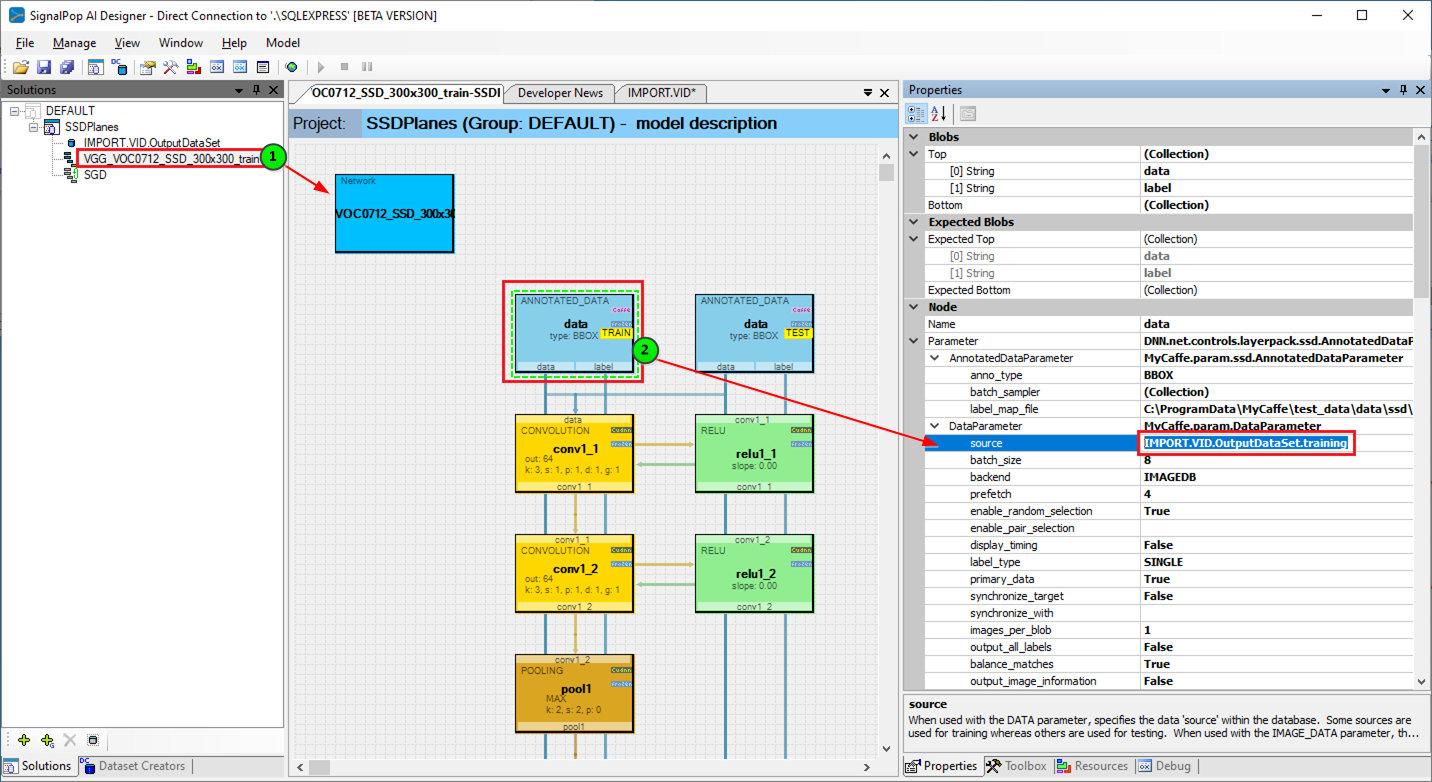
After pressing OK the new SSDPlanes project will be added to the solutions. Next, open the new SSDPlanes project and double click on the VGG_VOC0712_SSD_300x300 model which will open the model for editing. By default, this model is setup to use the VOC0712 dataset, so we will next change it to use your new dataset IMPORT.VID.OutputDataset. To change the dataset, click on the AnnotatedData layer for the TRAIN phase and change its DataParameter.source field to the training portion of your new dataset IMPORT.VID.OutputDataSet.training. Do the same with the AnnotatedData used during the TEST phase and use the same training data source for this initial training session.
Save your project and you are ready to start the initial training session.
Step 6 – Initial Training
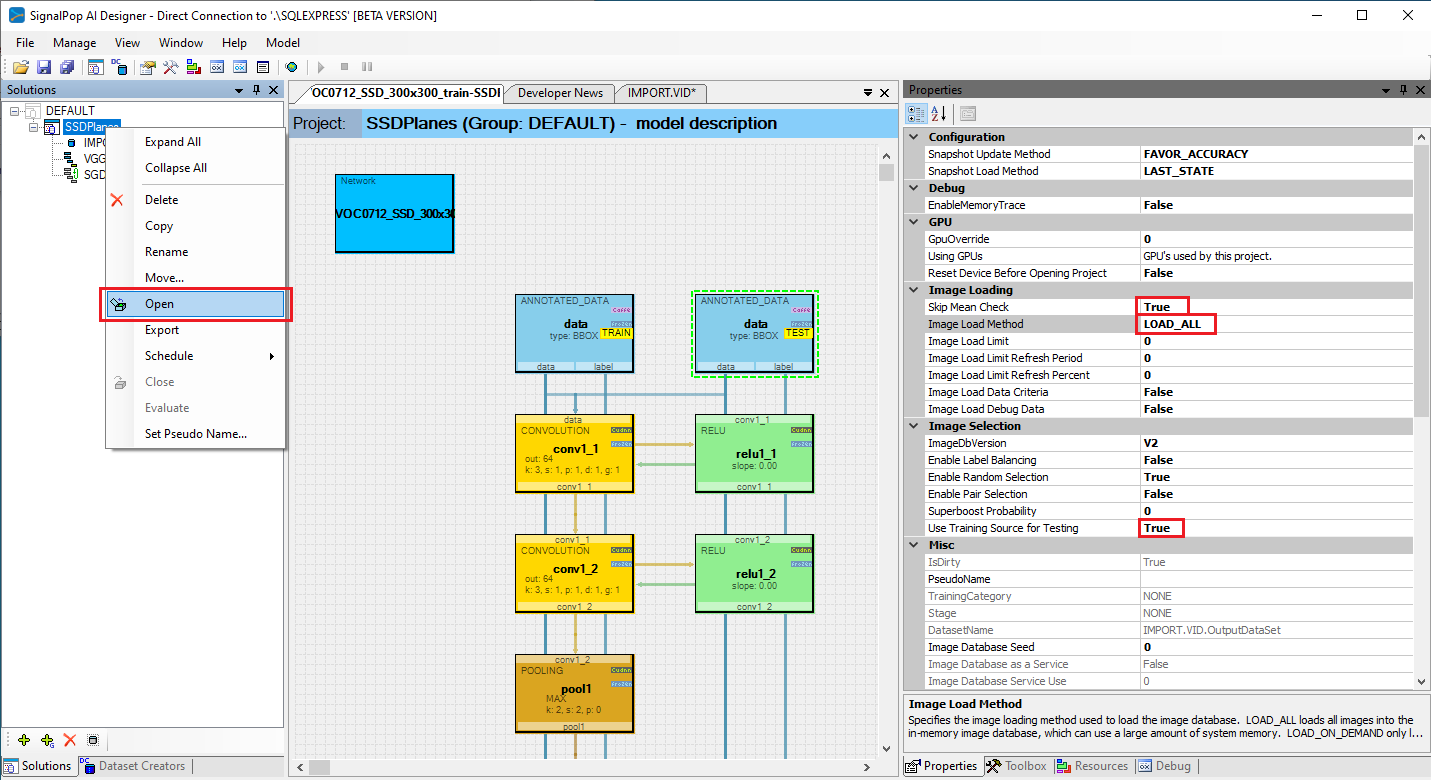
Before opening the SSDPlanes model, select it and change the following properties:
Skip Mean Check = True (no mean used)
Image Load Method = LOAD_ALL (load all images into memory)
Use Training Source for Testing = True (use the same training set for testing)
Next, open the project by right clicking on the project and selecting the Open menu item.
To speed up our training, we next need to import a portion of the pre-trained SSD model. Once the project completes opening, from within the Solutions window, expand the SSDPlanes project, right click on the Accuracy ((![]() ) node and select the Import menu item to import new weights.
) node and select the Import menu item to import new weights.
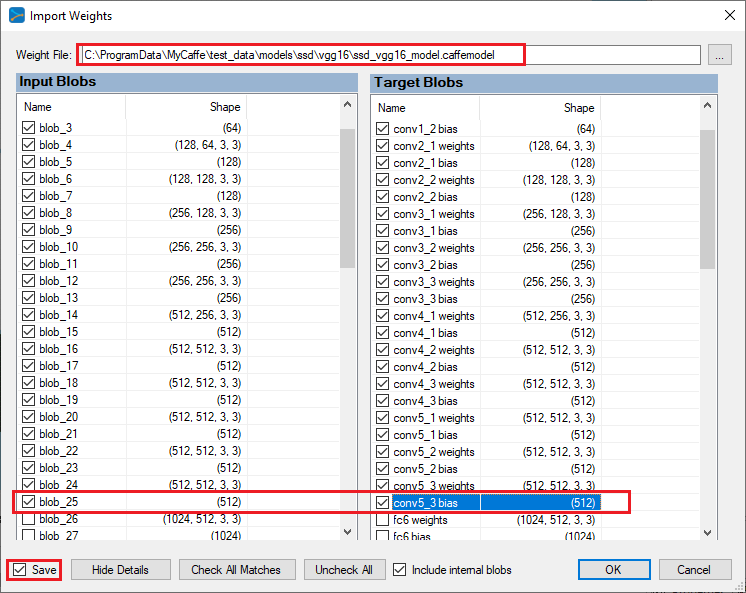
Select the pre-trained ‘ssd_vgg16_model.caffemodel‘ weight file installed with the SignalPop AI Designer shown below.
 Import Pre-Trained Weights
When importing weights, you should only import the weights for the VGG16 portion of the model (e.g. up through the conv5_3 blob) for we want the model to learn the locations of our dataset which are different from those used in the pre-trained model. Make sure to check the ‘Save‘ check-box and press OK to import the weights into your model.
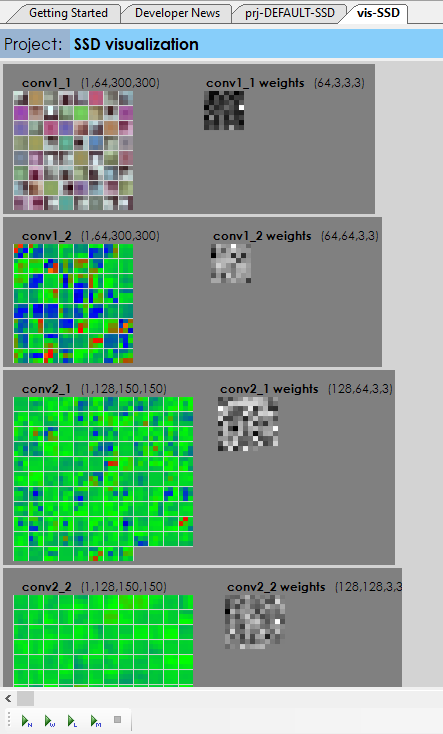
While the project is open, double clicking on the Accuracy ((![]() ) node opens the project visualization viewer window. From this window, select the ‘Run weight visualization‘ ((
) node opens the project visualization viewer window. From this window, select the ‘Run weight visualization‘ ((![]() ) button to view the imported weights which should look something like the following.
) button to view the imported weights which should look something like the following.
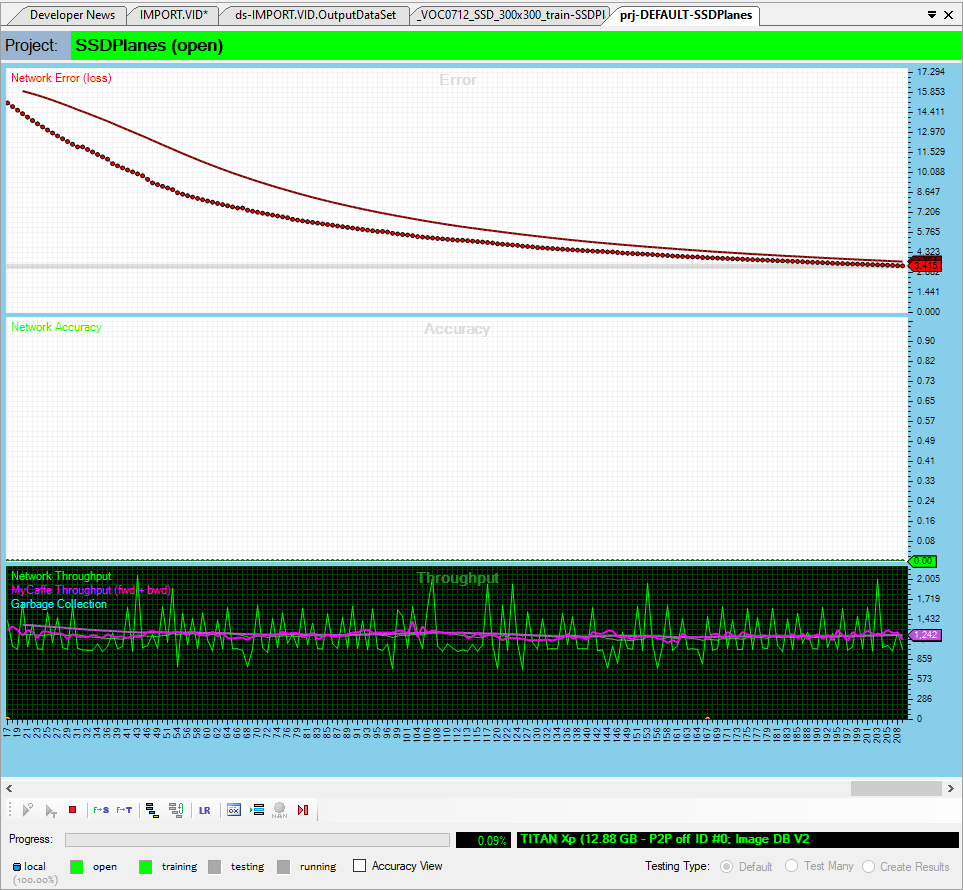
If they do, you are now ready to start the initial training session. To start training, double click on the SSDPlanes project to open its project window and then select the Run Training ((![]() ) button. Run the training for around 200-300 iterations on your initial training for we want to learn the model just enough to help you expand your annotation selections.
) button. Run the training for around 200-300 iterations on your initial training for we want to learn the model just enough to help you expand your annotation selections.
Step 7 – Expand your Annotations
Now that you have a trained model, it is time to expand your annotations from the initial 20-30 images annotated to a larger set to be used on the next training session.
To expand the annotations, first stop the training and close the project. Next, go back to the ‘Dataset Creators’ pane for you will need to re-activate all images within your dataset.
Double-click on your IMPORT.VID.OutputDataSet dataset with in the Dataset Creators pane to open the dataset, and select the ‘Activate all images‘ ((![]() ) button.
) button.
Once activated, re-index your dataset as discussed in step 3 above. Now, go back to your project, re-open it to reload the full image set, and once opened, double-click on the SSDPlanes project to open its project window.
This time, instead of training the project, we are going to run its ‘Test All‘ function on 100-200 images from the dataset (many of which do not have any annotation data).
IMPORTANT: Make sure to check the ‘Use Training Dataset’ when running the test for we want to expand the annotations in the training dataset.
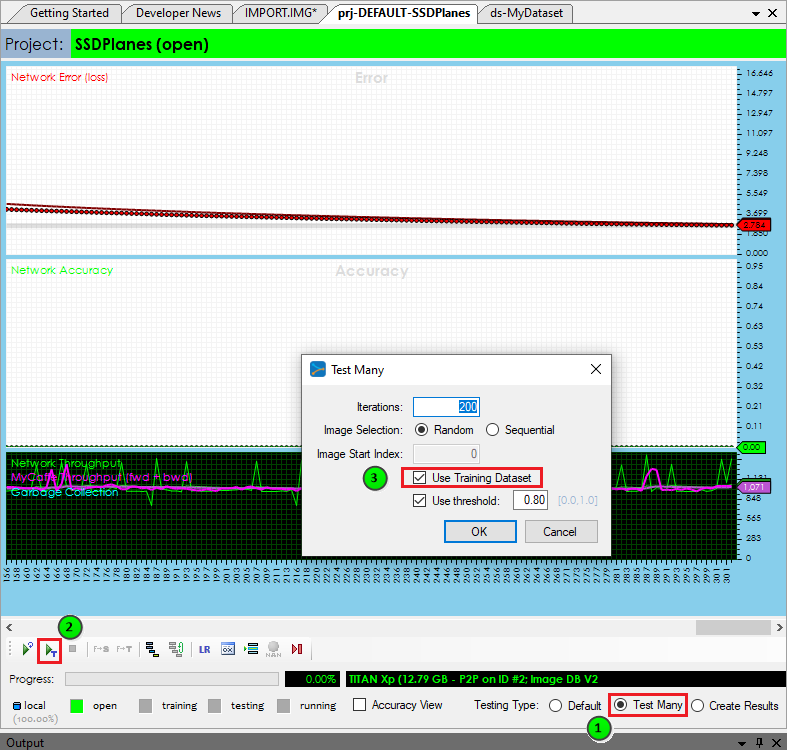
From the project window, check the ‘Test Many‘ radio button and then select the ‘Run Testing‘ (![]() ) button and select 100 images to test.
) button and select 100 images to test.
Upon completing (testing more than 300 images can take some time) the ‘Test Many Results‘ window is displayed.
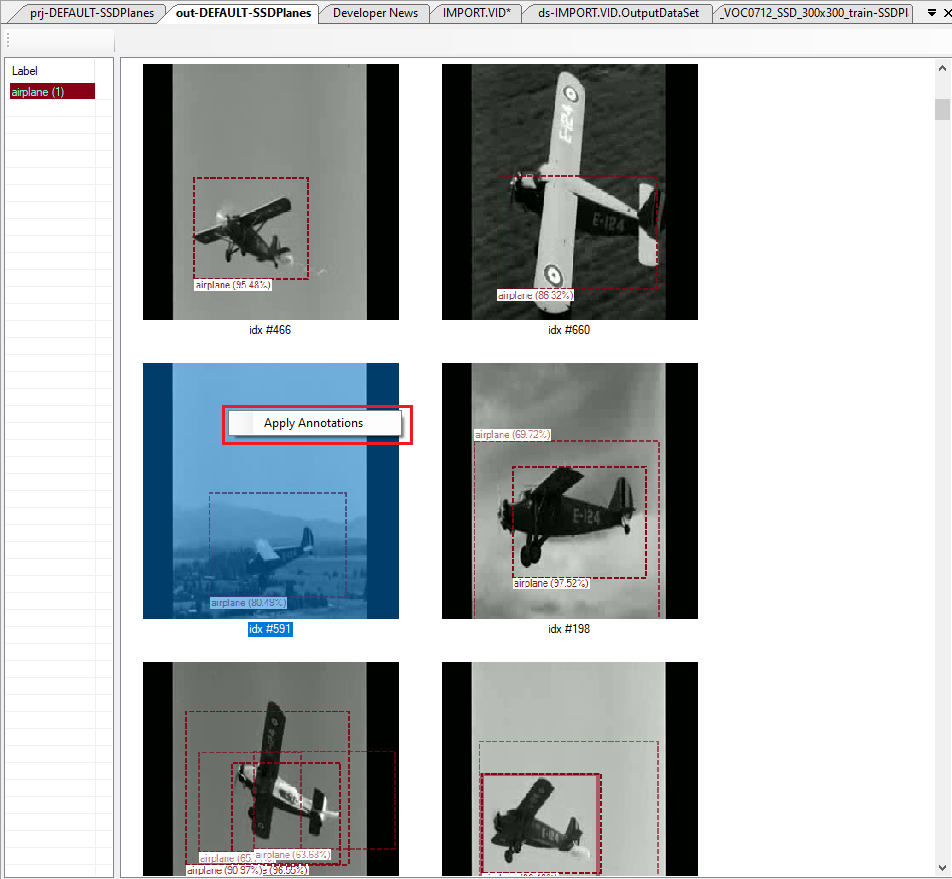
Right click on each detection that looks good to you and select the ‘Apply Annotations‘ menu-item to add the new annotations to your dataset. This process allows you to quickly build up your dataset from a very small sub-set used during training.
Once you have added a sufficient number of new annotations, repeat the steps starting at step 3 above and soon your model will be ready to run on the full video to produce the annotated video.
Step 8 – Creating your Annotated Video
Once your model has trained on a sufficient number of annotations with varying backgrounds and plane orientations, you are ready to create your annotated video.
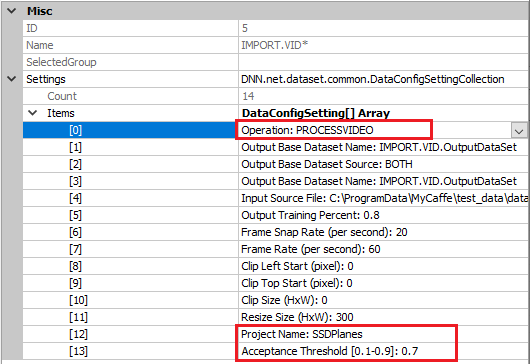
The IMPORT.VID dataset creator is used for this purpose. Double-click on your IMPORT.VID.OutputDataSet dataset with in the Dataset Creators pane to open the dataset. Next, change the ‘Operation‘ to PROCESSVIDEO and set the ‘Project Name‘ to your SSDPlanes project.
When run, the IMAGE.VID dataset creator first uses MyCaffe to open your trained SSDPlanes project, and runs it on each frame within your video to produce new detected annotations. These frames are then saved with each annotation drawn on the frame to produce a full set of annotated frames.
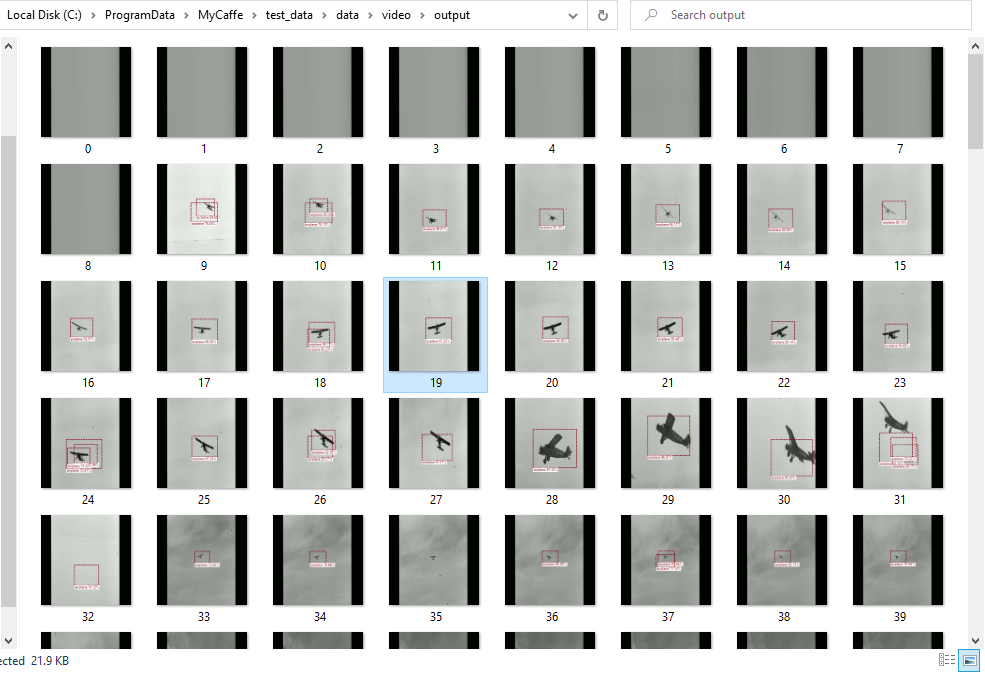
The annotated frames are placed into the ‘output‘ subdirectory within the same directory for which your WMV video sits.
Once all frames are produced, you can easily use the Video Editor feature within the Photos App to create a new video of annotated frames to produce a final result such as the following.
Congratulations, you have now created your first annotated video using Single-Shot Multi-Box Detection (SSD)!
For other great tutorials on topics such as Neural Style Transfer, beating ATARI Pong and creating new Shakespeare sonnets, check out our Tutorials page.
[1] Wei Liu, Dragomir Anguelov, Dumitru Erhan, Christian Szegedy, Scott Reed, Cheng-Yang Fu, Alexander C. Berg, SSD: Single Shot MultiBox Detector, arXiv:1512.02325, 2016.