
This tutorial will show you how to use the TripletNet as described by [1] and [2] to learn the full MNIST dataset up to 80% accuracy while using only 1% of the original MNIST images.
Step 1 – Create the Dataset
Before creating the model, the TripletNet in this sample will use the MNIST dataset. If you have not already done so, you will need to download the MNIST data files which you can get here.
To create the dataset, open the MNIST Dataset Creator from the Dataset Creators pane and add the file locations of each of the MNIST data files downloaded above. Next, make sure the Channels property is set to 1 and select the Run (![]() ) button to start creating the dataset.
) button to start creating the dataset.
To view the new MNIST dataset, expand the MNIST Dataset Creator and double click on the new MNIST dataset.
Double clicking on any image will show a larger view of the image and right clicking in an area other than an image displays a menu that allows you to view the Image Mean.
Once completed, the new dataset will be named MNIST and look as follows.

The MNIST dataset contains 60,000 training and 10,000 testing images of hand written digits.
Next, we need to create a dataset that represents a small 1% subset of the full MNIST dataset. To do this, we will use the COPY dataset creator with the following settings.
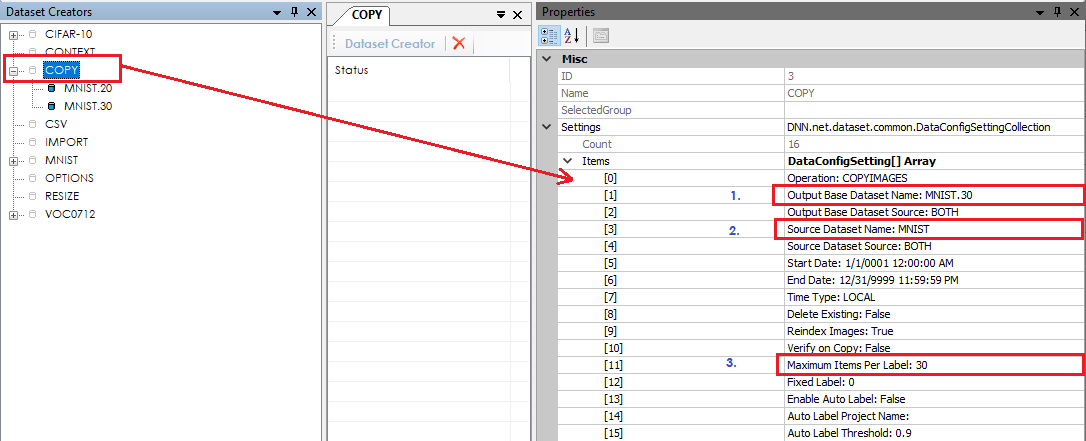
After opening double clicking on the COPY dataset creator, change the following settings and run the dataset creator to create a sub-set of the MNIST dataset.
1.) Change the Output Base Dataset Name to MNIST.30
2.) Change the Source Dataset Name to MNIST
3.) Change the Maximum Items Per Label to 30
Running the dataset creator will produce at small dataset of 600 images where 30 images per label are created for the training set and 30 images per label are created for the testing set.
Step 2 – Creating the TripletNet Model
The first step in creating a model is to select Solutions pane and then press the Add Project (![]() ) button at the bottom pane.
) button at the bottom pane.
Next, fill out the New Project dialog with the project name, MNIST dataset, select Create Template-based Model/Solver and use the TripletNet_28x28 CENTROID model and TripletNet_28x28 solver templates.
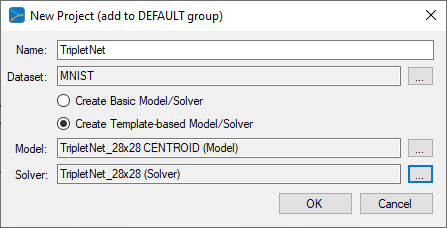
After pressing OK, the new TripletNet project will be added to the solutions.
To view the TripletNet model, just double click on the TripletNet item within the TripletNet project. This will open the visual model editor containing the TripletNet model which looks as follows.
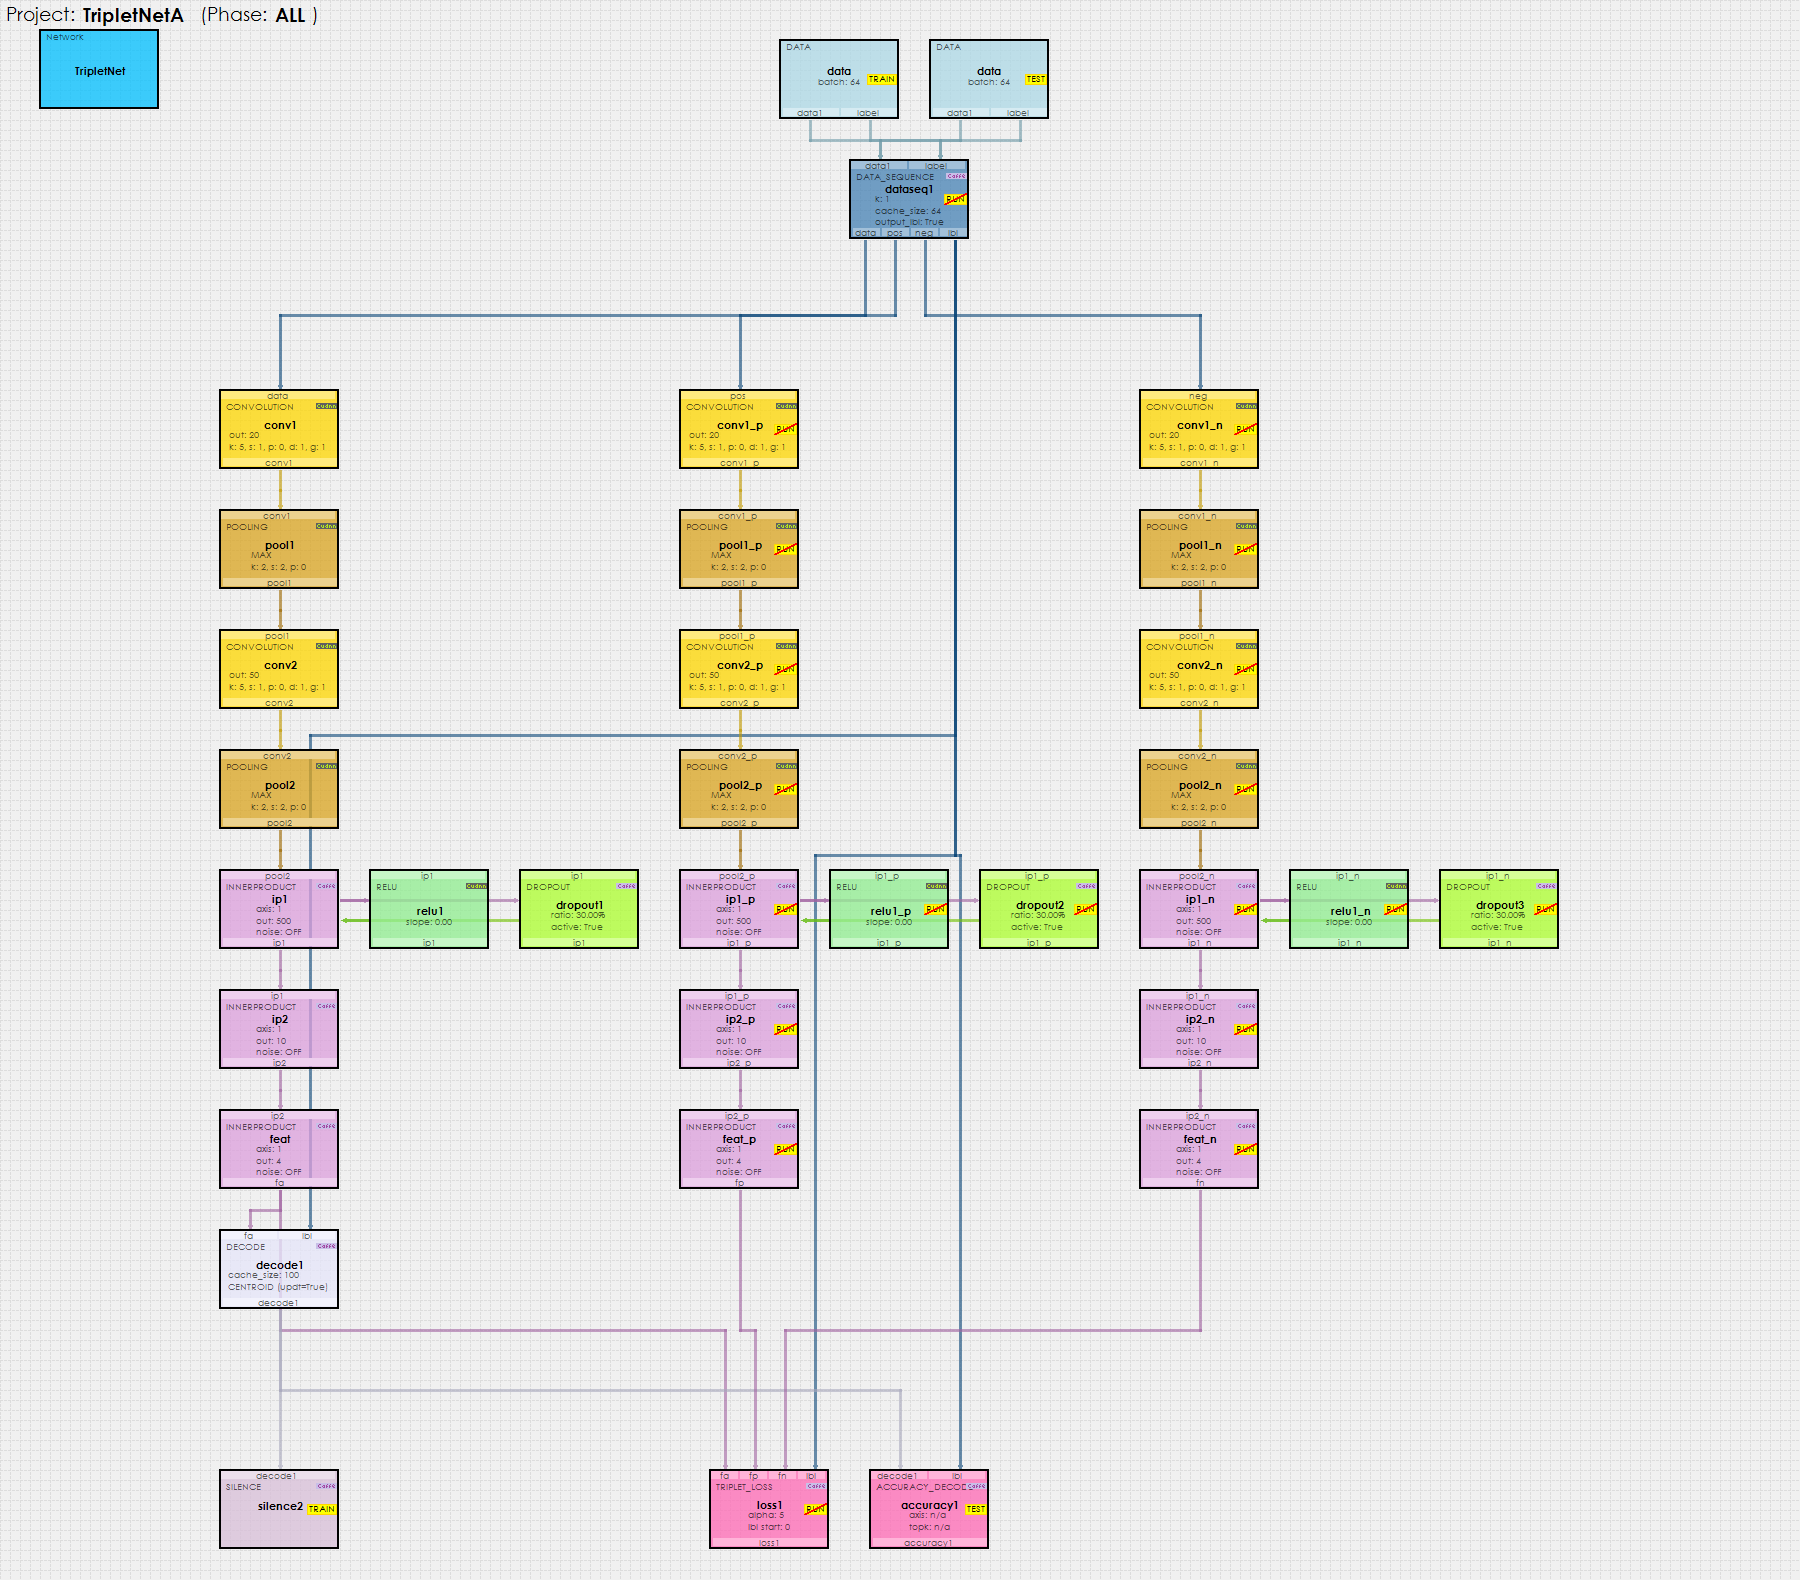
As the name implies, above you will see that the model consists of three parallel networks. On each forward pass, the Data Sequence Layer feeds three different images into the three networks where the first image (anchor) is fed into the first network, the second image (positive match) is sent to the second network and the third image (negative match) is sent to the third network. All three networks share the same weights. At the bottom of the network, the Triplet Loss Layer calculates the loss and gradients in such a way [3] that moves the positive matches closer to each anchor while moving the negative matches further away from each anchor.
Before training, first copy the new, small MNIST.30 dataset onto the TripletNet project.
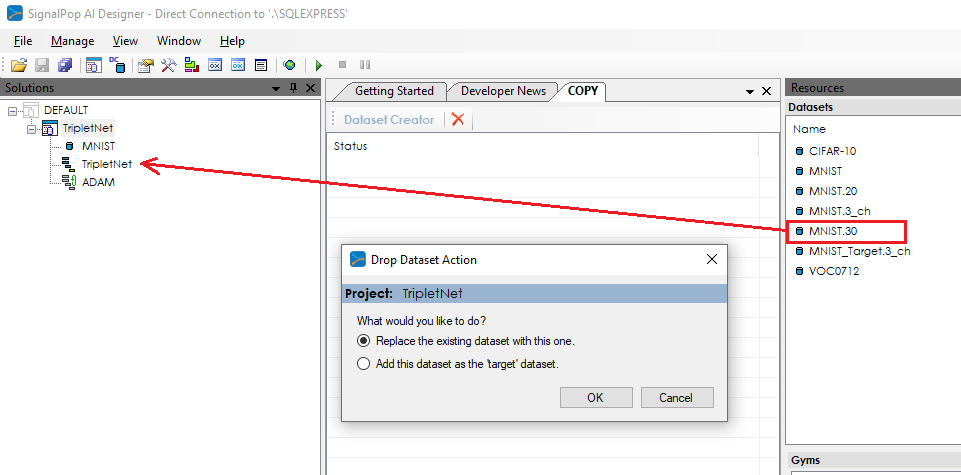
Upon dropping the target dataset the Drop Dataset Action dialog will appear – select the option to add the dataset as the target dataset and press OK.
After updating the project, you will see both the source and target datasets appear in the project as shown above.
Step 3 – Training the TripletNET Model
Before training, you must first open the project to load it into the GPU’s used. To view the settings used by the project, select the TripletNet project and then select the Properties window. There are a few project settings to note that impact how the project operates when open.
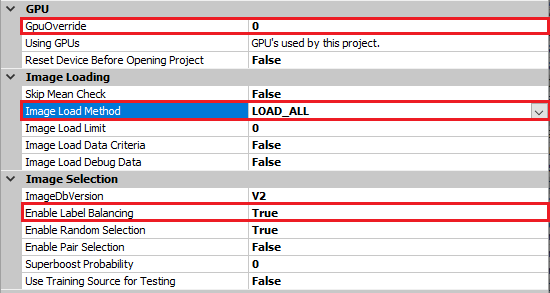
GPU Override – select the GPU ID on which you want to open the project, as shown above we will be using GPU ID 0.
Image Load Method – the image load method specifies how to load the images into memory where the following options are available:
LOAD_ON_DEMAND – this default option causes slower training initially for on each training cycle new images are loaded into memory. Eventually, after all images are in memory the training runs at full speed. However, this option is handy when you would like to quickly open a project for the project load time is very fast.
LOAD_ALL – this option causes all images to load into memory before starting the training which has a slower project load time, but very fast training once all images are in memory.
LOAD_FROM_SERVICE – this option offers a blend of both of the previous options in that all images are loaded in the background by the SignalPop In-Memory Database Service. Once all images are loaded, the service holds all images in memory allowing future projects that use the images to load very quickly. Note when using this option you must configure the service to use a log-on account that also has access to your database.
To open the project, right click on the TripletNet project and select the Open menu item. A green LED will blink on the project and become solid green once the project is open. When training, it is often helpful to view the progress of the training. To view this information, double click on the TripletNet project to open the Project Window.

To start training, press the Run Training (![]() ) button in the lower left corner of the Project Window. After training for around 4,000 iterations, you should see an accuracy of around 80%.
) button in the lower left corner of the Project Window. After training for around 4,000 iterations, you should see an accuracy of around 80%.
After your training has completed, you are ready to validate your model by running it against the original full MNIST dataset which contains 10,000 testing images.
To validate your model, first select the Test Many radio button on the lower right hand side of the Project Window. This test operation runs 1000 randomly selected images from the selected dataset through the model and tabulates the results.
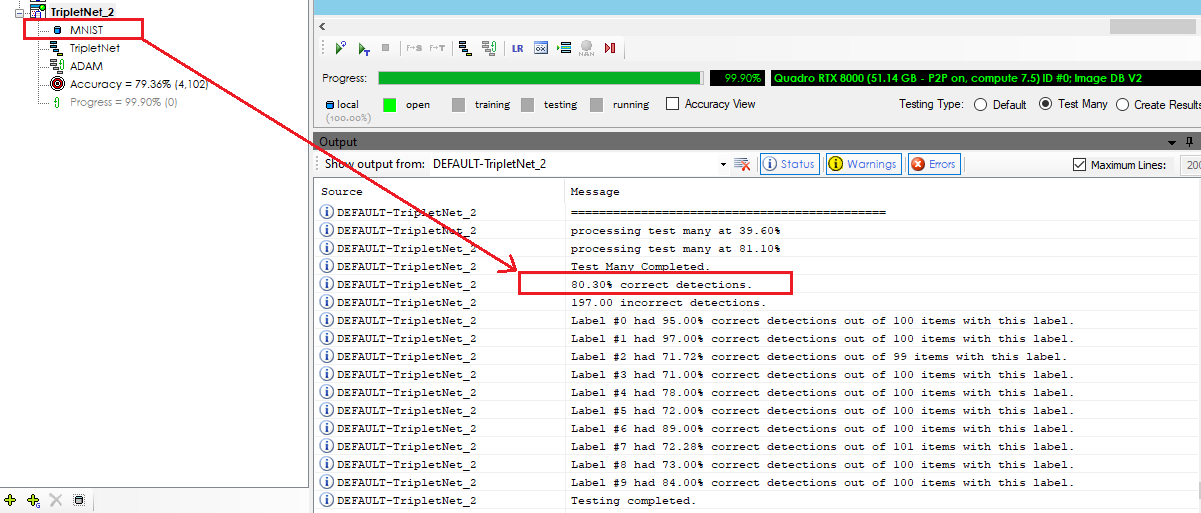
Select the Run Testing (![]() ) button to start the validation test, which upon completion should show an accuracy of 80% of the full MNIST dataset.
) button to start the validation test, which upon completion should show an accuracy of 80% of the full MNIST dataset.
You have now created your first TripletNet Neural Network using the SignalPop AI Designer and learned MNIST within 80% accuracy using only 1% of the MNIST images!
[1] E. Hoffer and N. Ailon, Deep metric learning using Triplet network, arXiv:1412:6622, 2018.
[2] A. Hermans, L. Beyer and B. Liebe, In Defense of the Triplet Loss for Person Re-Identification, arXiv:1703.07737v2, 2017.
[3] Shai, What’s the triplet loss back propagation gradient formula?, StackOverflow, 2015.