

How Can We Help?
Training and Testing with Python
Using MyCaffeControl with Python
Using pythonnet, virtually all of MyCaffe is programmable with the Python programming language. This sample demonstrates how to train and test the MNIST dataset of hand written characters by programming the MyCaffeControl using Python.
Python Environment
Before jumping into the code, you will need to setup your Python project environment to use a 64-bit version of Python, for MyCaffe is 64-bit software. For this example, we use version 3.6 of the 64-bit Python.

From within your environment, MyCaffe uses pythonnet to interact with the MyCaffe data types. To install pythonnet, run the following command:
pip install pythonnet
After pythonnet completes installing, your environment should look similar to the image shown above.
Programming MyCaffe in Python
To access MyCaffe in Python, the clr is used to add a reference to each MyCaffe DLL used, which then gives the Python environment access to each object and type implemented within the MyCaffe DLL.
There are three basic steps that take place when training and testing a model with MyCaffe from Python: Initialization, Loading a Project, and Training/Testing.
Initialization
During initialization, all references are made to the MyCaffe DLL’s used and several basic objects used to configure MyCaffe are set up.
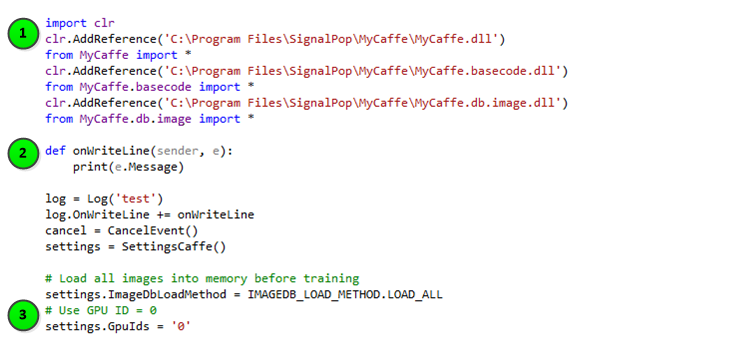
The following steps take place during initialization.
1.) First, the clr is used to add references to all MyCaffe DLL’s used. Adding a reference to each DLL gives Python access to the objects and types within the DLL.
2.) Next, the Log, SettingsCaffe and CancelEvent objects are setup. The Log object provides output to the console window via its OnWriteLine event. The SettingsCaffe object tells the MyCaffeControl how initialize itself. And, the CancelEvent object gives your application the ability to abort a training or testing session.
3.) The SettingsCaffe object, in the sample above, is configured to instruct the MyCaffeControl to load all dataset images before training or testing and run the CUDA operations on the GPU with ID = 0.
Loading a Project
Before creating the MyCaffeControl, we setup and load the data of the project which includes the solver description text, the model description text and the DatasetDescriptor of the dataset that the model will train and test on.
As noted, in previous sections, MyCaffe uses projects to hold the solver descriptor, model descriptor and dataset descriptor of the dataset for which they run. In addition, each project holds the trained results stored within the model weights.
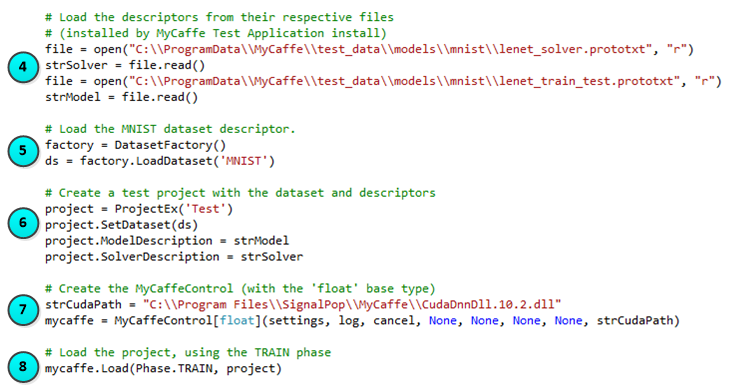
The following steps describe how to load a project.
4.) First, the model and solver descriptors are loaded from their prototxt files (which are text files). The model and solver descriptors used in the sample above are automatically installed when installing the MyCaffe Test Application.
5.) Next, the DatasetFactory loads the ‘MNIST‘ DatasetDescriptor from the database. NOTE: The ‘MNIST‘ dataset is loaded into the database via the MyCaffe Test Application.
6.) The ProjectEx is created and configured to hold the ‘MNIST’ DatasetDescriptor, the model description (loaded from the model prototxt) and the solver description (loaded from the solver prototxt). This information tells the MyCaffeControl how to load the project.
7.) Next, the MyCaffeControl is created with the float base type. NOTE, the strCudaPath directs the MyCaffeControl which version of the low-level CUDA DLL to use – in the sample above, the version supporting CUDA 10.2 is used.
8.) And finally, the MyCaffeControl loads the project with the TRAIN Phase.
Training and Testing
Once the project is loaded into the MyCaffeControl, you are ready to start training and testing.
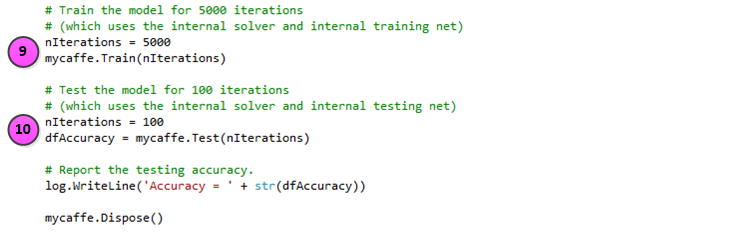
The following steps take place when training and testing the project.
9.) Training is started by calling the MyCaffeControl Train method and in the example above, we train for 5000 iterations.
10.) Once trained, testing is performed by calling the MyCaffeControl Test method and in the example above, we test for 100 iterations. After the testing completes, the accuracy is written to the console window running Python.
When you are done using the MyCaffeControl, calling its Dispose method releases all resources used.
To download the source code and try this out yourself, see the Python MyCaffe Image Classification Sample on GitHub.